如果你接触过移动应用开发,那么你很可能已经听说过 Model-View-Controller(简称MVC)。
MVC是一种相当传统、经典的开发模式,Apple官方也推荐使用这种模式开发iOS应用。
在MVC下,所有对象都被分为3大类:
- 持有数据的
Model; - 显示用户界面的
View; - View和Model通讯的桥梁:
controller;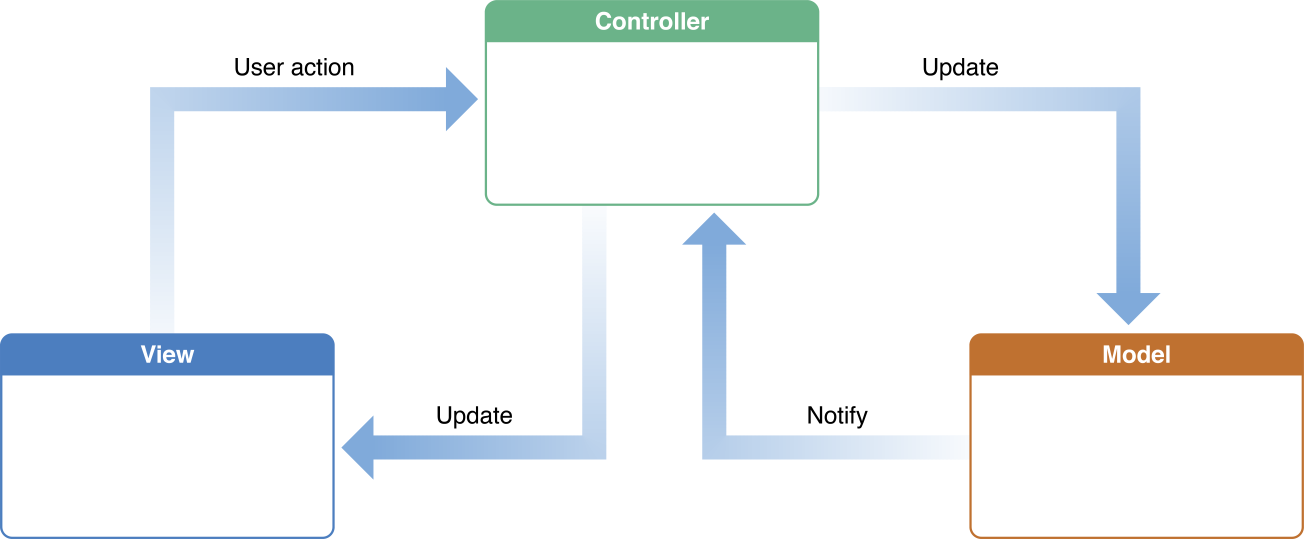
View和Model之间不会直接的相互引用,它们之间的沟通是通过controller来协调的。用户对界面View进行了操作,View就会通知Controller更新Model的状态;Model的状态改变,会通知controller去更新界面View。
在iOS中哪些组件分别与M、V、C对应?
Model: 通常非常轻量简单,是你自己定义的类或者结构体,比如一个拥有姓名和电话号码等数据的Person类。
View: UIKit中的组件,或者是你自定义的继承于UIView的类,比如UIButton,UILabel。你可能会把它们放在 .xib 或者 Storyboard 文件中。
controller: 几乎等同于视图控制器(View Controller),通常是UIViewController或者它的子类。UIviewController就像一个繁忙的工场。拥有生命周期的它不仅负责Model和View的交互,还负责了视图的loading,appearing,disappearing等。

Massive View Controller
一个View Controller,往往包含了许多的IBOutlet属性,并且实现了多个protocol的响应方法,这足以让View Controller变得臃肿。雪上加霜的是,在实际项目中,你还能发现业务逻辑和model层的数据处理逻辑混杂其中。
如果有人告诉你,他在一个View Controller中看到了上千行的代码,我想你并不会为此感到惊讶。
因此有人调侃iOS架构中的MVC是Massive View Controller的意思。
一个体积庞大的视图控制器,它所带来的弊端是显而易见的,就是难以维护,也难以写单元测试。相信有不少人已经放弃对View Controller写单元测试了。
在iOS开发中,我们都在尽可能的将代码从View Controller中分离出来,以保持它的简洁。有时候,代码是少了,但仍不能使得View Controller的结构清晰。受限于生命周期和Views的回调方法,有时候同一个操作在好几个地方都需要调用。
比如,当我们对一个属性(name)赋值时,我们需要让View Controller更新对应的视图,因此我们在该属性(name)的set方法中调用更新视图的方法updateUI()。
但如果赋值操作是在视图加载完成之前进行的呢?最后,我们不得不这么做,在set方法中判断视图加载完毕的情况下,才调用updateUI(),接着在viewDidLoad方法内也补充调用updateUI()。
|
|
MVC带来的好处已经非常多了,但我们不满足于此。
Model-View-ViewModel
在实践中发现,Views和它对应的View Controller总是成对出现,如此紧密的耦合,我们不妨将它们看成同一个组件。
所以,一个想法诞生了😄…

(MVVM是微软的一位架构师John Gossman提出的,具体历史请参阅这里)
在MVVM下,View Controller不再引用Model,而是引用到View Model。
像有些代码,是为了把Model的数据转换成View能展示的值,我们称这些代码为“展示逻辑”。
View Model就是存放”展示逻辑”的好地方。验证用户输入、网络请求 等都可以放在View Model层。
但关键的一点是,不要引用任何View。严格来说,在View Model中不该 #import UIKit.h。
让我们看一下代码示例(From Ash Furrow):
Model层有个Person:
有一个PersonViewController,在viewDidLoad中根据model的属性设置label。
这就是在MVC模式下,我们通常所做的。现在让我们来看一下加入View Model后会如何:
View Model的内部实现是这样的:
原本在viewDidLoad中的展示逻辑,被移到View Model中。现在的viewDidLoad非常简洁😁:
正如你所看到的,相对于原来的MVC并没有大变化,还是原来的代码,只是展示逻辑被放置到View Model。
MVVM与MVC是兼容的,也就是说,你有机会将原有的项目从MVC模式,一点一点的过渡为MVVM模式。
再看看我们可以多么轻松的写测试代码:
SpecBegin(Person)
    NSString *salutation = @"Dr.";
    NSString *firstName = @"first";
    NSString *lastName = @"last";
    NSDate *birthdate = [NSDate dateWithTimeIntervalSince1970:0];

    it (@"should use the salutation available. ", ^{
        Person *person = [[Person alloc] initWithSalutation:salutation firstName:firstName lastName:lastName birthdate:birthdate];
        PersonViewModel *viewModel = [[PersonViewModel alloc] initWithPerson:person];
        expect(viewModel.nameText).to.equal(@"Dr. first last");
    });

    it (@"should not use an unavailable salutation. ", ^{
        Person *person = [[Person alloc] initWithSalutation:nil firstName:firstName lastName:lastName birthdate:birthdate];
        PersonViewModel *viewModel = [[PersonViewModel alloc] initWithPerson:person];
        expect(viewModel.nameText).to.equal(@"first last");
    });

    it (@"should use the correct date format. ", ^{
        Person *person = [[Person alloc] initWithSalutation:nil firstName:firstName lastName:lastName birthdate:birthdate];
        PersonViewModel *viewModel = [[PersonViewModel alloc] initWithPerson:person];
        expect(viewModel.birthdateText).to.equal(@"Thursday January 1, 1970");
    });
SpecEnd
通过示例可以看到,使用MVVM的代价是我们的代码量会轻微增加,但好处是降低了程序的复杂性。这是一笔很划算的交易。
另外,可以使用开源项目ReactiveCocoa或者RxSwift来协助你实践MVVM模式,它们的绑定机制能带给你很多的便利(学习曲线比较陡)。当然,使用ReactiveCocoa或者RxSwift都不是必须的,你完全可以不用任何框架来实践MVVM。
参考链接:
- https://developer.apple.com/library/ios/documentation/General/Conceptual/DevPedia-CocoaCore/MVC.html
- https://www.objc.io/issues/13-architecture/mvvm/
- http://www.teehanlax.com/blog/model-view-viewmodel-for-ios/
- https://github.com/ReactiveCocoa/ReactiveCocoa
- https://github.com/ReactiveX/RxSwift
- https://en.wikipedia.org/wiki/Model–view–viewmodel